Wednesday, February 3, 2010

New Classes

February Classes!
Email me at scrapladybug@goeaston.net and I will send you more information and a class schedule.


Creative Cards - $15.00
We will be completing all 4 of these interactive cards!


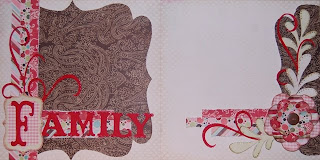
Family and Friends Layout set - $20.00
In this class you will be creating TWO 2 page layouts (4 pages total) The pictured "Family" Layout will have a coordinating "Friends" layout to complete with your "leftovers". You will be choosing from 5 different color schemes to create this set of stunning 2 page layouts.

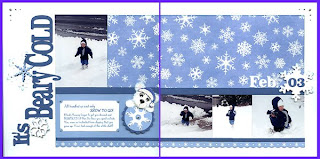
"Beary Cold" - $18.00
Available in shades of blues, pink, purples and a bright and fun color scheme. You choose your layout shades!

Monday, October 26, 2009

Boys, Boys, Boys


These two layouts were created using paper from Bo Bunny. I LOVE that product line! Each layout was constructed in a different way. Just wanted to show you the endless possibilities to scrapbooking.
Now, where is my son and a big pile of mud he can go play in....

Give Thanks Layout

With Thanksgiving right around the corner I though I would come up with a layout to celebrate the Holiday. Unfortunately, I am still so far behind on my personal scrapbooking that I placed last years photos on it.

I love the texture of this layout. I used gold embossing powder to do the swirls that accent the bottom of the layout and also the acorn and leaves on the scalloped circles.

Happy Scrappin.

Thursday, October 8, 2009

Fall title and Layout

This is a sample of the FREE Make-N-Take I am doing at a Scrapbooking and Rubber Stamping Expo I will be attending. I am hoping to encourage some additional sales by having the coordinating layout available for sale.


Tuesday, September 29, 2009

Matching Titles

Told you I have been busy! These items were created for a "Title Swap" at my local scrapbook store. I made them to coordinate with the border swap that I did in the previous post.

Hope you like my ideas!

Borders, Borders and more Borders!

Sorry to be away from my poor little blog. I had a huge commitment of swaps to do for SCS and have finally gotten them all done. Now I have time to post what I have been working on.


These are 6 sets of borders that I did for a swap on SCS. Hope you like them.
They were for a 4 Seasons Border swap and you needed to include a journal box, at least one photo box and 2 pieces of page candy.

Friday, September 11, 2009

I do CARDS too!

Bet you girls are thinking, "Does she only do layouts?" Well they are my favorite but I also do an occasional card now and then. I dug deep into my "Pictures" folder to find this one for you. I was in a Penny Black Hedgehog Image swap a few months ago and sent this card to the hostess as a thank you. It also used the ONLY Penny Black image I had at the time. (Yes, my collection on those critters is growing! Yeah)


Hope you like my card. Oh, I used white fun flock to make there bellies fuzzy. It had great texture.

Thursday, September 10, 2009

My Beach Babies!

I really hate to see summer come to an end. Although I love fall and all the beautiful new colors of the season the slight chill in the air makes me very sad. I am one of the few that love the 80, 90 and 100 degree days.

Although we did not make it to the beach this year, :( I still have plenty of pictures to scrap from years past. I actually created this layout for a Summer Swap I am in on Split Coast Stampers. As soon as I got it complete I printed my photos and placed them on. What a perfect and simple way to spend a day!


The "Day at the Beach" Title was designed using Cricut Design Studio, sand castle (I made the upper 3 windows larger to fit the photos) and ball are actually from "Life's a Beach" cartridge, pail is from "Joys of the Season" (Maids a milking!) and the shovel came off of "Paper Dolls" (Be sure to look at the extras on that cartridge.)

As usual, Happy Scrappin!

Friday, September 4, 2009

Summer's End - Let's Eat!


The end of summer is here...time to spread a little cheer! I created this layout for a swap at our local scrapbook store, P.S. I Love you Scrapbooking. This would be the perfect layout for a BBQ, Watermelon Eating contest or other summer activities that involve food!


I hope you like it, you can also have a this listed on eBay, Summer BBQ, if you are interested in getting it for yourself.


The pattern paper came from a set at Target - in the dollar bin! The bears were hand torn and created by me and I designed the "Let's Eat" title in Sure Cuts A Lot and the ant in Cricut Design studio using George and Basic Shapes.


Happy Scrappin!

Thursday, September 3, 2009

Do you need "Smore Fun"!

S'mores are my favorite treat and we have "S'mores Parties" on our front patio at least once a week during the fall.

I did this layout for a Split Coast Swap that I am in and just love how it turned out. I made the title in Cricut Design Studio. The bears are had torn out of mulberry paper and that process is really long to explain how they are made.

This layout is also listed on eBay for sale "Smore Fun" (your link to it).

Please email me with any questions that you may have. And wipe the chocolate off your face!
Happy Scrappin.


Wednesday, September 2, 2009

Let's go Camping!

Grab your flashlight and tent, it's time for the Great Outdoors. I did this layout for a Cricut swap that I am participating in on Split Coast Stampers. The lantern, coffee pot, dutch oven, fire and sign were all cuts from the Camp Out Solutions cartridge. This cartridge has a great selection of outdoor items perfect for any hunters, fishermen, and campers.

I'm really sorry but I can't remember the manufacturer of the paper. The orange stamped section is from a CTMH stamp set called Under the Stars.

Happy Scrappin!

Tuesday, September 1, 2009

Back to School


Well it's that time of year when I get really depressed. I HATE school! Yes, more than my children do! We rush to get homework done, shove dinner down, get in the tub, ohhhh and look, now it's time for bed. Ifeel like I never get to see them when school starts back up.

The only up side to it of course is a great photo opportunity. With that comes the layout.....by now you should know that I LOOOOOVVVEEE my Cricut. Hope you enjoy this little creation I put together. "School Rules" (Not for me, I miss my kids.)
The black mats are suppose to represent chalk boards and you can even put photos in the bus windows. If you are a Split Coast swapper you may see this coming your way for a Border Swap I am participating in and also a 4 Seasons layout swap.
As always, Happy Scrappin!

Wednesday, August 26, 2009

I'm a TEASER!

I love it when a plan comes together! I envisioned this one night in bed and had to actually get up and get my notepad to sketch it out. I have now learned to just leave my notepad by the bed just in case the creative mojo hits in the middle of the night again. Yes, I dream about scrapbooking layouts in my sleep. Do they have an "AA” group for that? "Hi, my name is Stephanie and I am addicted to SCRAPBOOKING!"

Well I created this layout to teach for a Cricut Swarm that my local scrapbook store puts on. To find out more information go to P.S. I Love You Scrapbooking.

I will not be able to share the cutting instructions on this layout at this time, sorry! That's why I am such a TEASER today! But it turned out so cute I just had to share. Happy Scrappin!

Pooh and Friends cuts

Sorry! Once again, life got in the way of my poor little blog! Thank you to my followers and I promise to do better in the future.

Here are the cuts from the "Pooh and Friends" cartridge to complete the layout that I posted, like 2 weeks ago. (I am so sorry!)

Sun, Color-Yellow, Size 3", Use Icon, Shift (grey keys) and hit Row 1, Key 6. For the orange part of the sun, use Icon, hit Row 1, Key 6.
Bee Stripes, Color-yellow, Size 1 1/2", Use Icon, Shift, hit Row 1, Key 2 (discard wings). For his body, color-black, same size, Icon, Row 1, Key 2. For his wings, color-lt. blue, same size, hit Row 1, Key 2 (discard head and stripes).
Worm, Color-yellow, size 1", use Icon, hit Row 1, Key 7. Stripes, color-black, same size, use Icon, Shift, hit Row 1, Key 7.
Grass, CUT 5 OF THESE TOTAL! Color-dk green, size 1 1/2", Icon, hit Row 2, Key 4. Color lt. green, same size, Icon, Shift, hit row, 2, Key 4.

There are all your cuts. I normally inch or use cats eye chalk on all my edges, I just love the way it shades things. I also used wiggle eyes on all the insects. Happy Scrappin!

Thursday, August 13, 2009

Garden Goodies - Stretch Your Imagination Cuts

Sorry I missed yesterday. I'm a slacker what can I say!

Here is a list of cuts using the Stretch Your Imagination Cartridge.

Tall Grass and Cricket, use dark green cardstock, size 5 1/2, Shift feature key and hit the grass button (Row 1, Key 7).
Use light green cardstock to cut the layer of this following the same cuts as above.

Birdhouse, use Ivory for base, dark Green for layers, and I hand cut a strip of brown to make a post. All cuts in size 4 and use the "shifted" birdhouse button (Row 4, Key 2)

Say tuned for tomorrow and learn the sizes for the cuts from "Pooh and Friends".

Tuesday, August 11, 2009

Garden Goodies - Walk in my Garden Instrucitons

Cuts from the Walk in my Garden Cartridge:
Sunflowers were cut using green, yellow and brown cardstock - Size 5 inch setting on your cricut and the "Border Feature" was used to make this cut. (On your key pad-Row 2, Key 9)

Grass Mound and Small sign were cut using green cardstock - Size 5 1/2 inch setting and the "Dirt" key was hit (On your key pad-Row 3, Key 4)

Brown Dirt mound was cut following the same instructions as the green grass mound. (Discard the small brown sign that will cut.)

Large Sign was cut using brown cardstock - Size 5 1/2 and the Sign Key (Row 3, Key 4)

Use Ivory cardstock and re-cut the above instructions. Cut the top and bottom of the post off and layer onto the sign area of the brown piece you just cut.
Stay tuned for tomorrow and you will recieve all the instrucitons for the items used on the Stretch Your Imagination Cartridge.

Monday, August 10, 2009

Garden Goodies Layout

"Garden Goodies" Layout
I used the Cricut and a combination of cartridges to built this gorgeous garden scene. To complete this layout you will need the following cartridges:
Stretch Your Imagination
Walk In My Garden
Pooh and Friends

I started this layout with a Sky blue cardstock base and then used my curvy cutter to cut the green wavy grass and adhered it to the bottom of the layout.

Stay in touch, tomorrow I will give you the instructions and sizes to complete all of the cuts using the Walk In My Garden Cartridge.

Happy Scrappin!

Thursday, August 6, 2009

New Look!

Did anyone notice I did a "Fashion Lift" on my Blog? I love the new look! Maybe this will encourage me to post each day now.
Monday will be the day I post a NEW layout and then I will give "HINTS" as to how you can complete the layout on your own each day for the rest of the week. By Friday you will have enough instructions to complete the layout on your own. The next Monday I will post a new layout and a new set of instructions for each day of the next week.
Here is a little peak.

Wednesday, July 8, 2009

Ready, Set, Go..

Okay, I've been away for a while again and have forgotten about my dear little blog. I promise I will be back tomorrow to add some interesting posts and pictures of the latest things I have going on.

Monday, April 13, 2009

Take a look at this cute "Tear Bear"


Okay, I am really a slacker! I opened this BLOG on April 1st and I am not doing so well with keeping it current.

I am going to try and post a photo of one of my adorable Tear Bear products that I sell in my eBay store. www.stores.ebay.com/scrapbookingbyladybug Take a look there for more adorable products.